This is default featured slide 1 title

Go to Blogger edit html and find these sentences. Now replace these with your own descriptions.

This is default featured slide 2 title

Go to Blogger edit html and find these sentences. Now replace these with your own descriptions.

This is default featured slide 3 title

Go to Blogger edit html and find these sentences. Now replace these with your own descriptions.

This is default featured slide 4 title

Go to Blogger edit html and find these sentences. Now replace these with your own descriptions.

This is default featured slide 5 title

Go to Blogger edit html and find these sentences. Now replace these with your own descriptions.

Nature

Header ADS

Monday, November 30, 2020

জেনে নিন অফিস এক্সেল এর শর্টকাট কী!

এক্সেল ব্যবহারকারীর জন্য কিছু গুরুত্বপূর্ণ শর্টকাট কী ও কিছু সূত্র জেনে নিন কাজে আসবে

প্রযুক্তির উৎকর্ষতায় এখন আর আমাদের কাগজ, কলম ও কেলকুলেটারের উভর নির্ভর করতে হয় না। আগে যে কাজটি করতে বছর বছর সময় লাগতো এখন চোখের পলকেই সম্ভব। আর এর সবই হয়েছে কম্পিউটারের মাধ্যমে। আমাদের প্রতিদিনের কাজে আমরা মাইক্রেসফট অফিসের বিভিন্ন টুলস ব্যবহার করি। যেমন মাইক্রেসফট ওয়ার্ড, এক্সেল। আজ আমরা এক্সেলের কিছু শটকার্ট কী জানবে-
শর্টকার্ট কী গুলি হল –
Ctrl+Arrow : ডানে, বামে, ওপরে এবং নিচে লেখার শেষে কারসর যাবে।
Ctrl+Home : ফিল্ড বা লেখার শুরুতে কারসর।
Ctrl+End : ফিল্ড বা লেখার শেষে কারসর।
Ctrl+Page Up : আগের পৃষ্ঠা বা ওয়ার্কশিটে যাওয়া।
Ctrl+Page Down : পরের পৃষ্ঠা বা ওয়ার্কশিটে যাওয়া।
Atl+Page Up : ডকুমেন্টের প্রথম কলামে অবস্থান করা।
Atl+Page Down : ডকুমেন্টের শেষ কলামে অবস্থান করা।
Atl+Enter : ফিল্ডে কারসর রেখে দুই ক্লিকের মাধ্যমে পরের লাইন তৈরি করা।
Shift+TAB : পেছনের ফিল্ড থেকে প্রথম ফিল্ডে একেক করে যাওয়া।
Ctrl+1 : ফন্ট, বর্ডার, নম্বর ইত্যাদির পরিবর্তন করা।
Ctrl+2 : ফন্ট বোল্ড করা।
Ctrl+3 : লেখাকে ইটালিক করা।
Ctrl+4 : লেখা আন্ডারলাইন করা।
Ctrl+5 : লেখার মাঝখান বরাবর কাটা দাগ (স্ট্রাইক থ্রু)।
Ctrl+7 : স্ট্যান্ডার্ড টুলবার সরিয়ে দেওয়া।
Ctrl+9 : কারসর যে ফিল্ডে আছে, তা মুছে ফেলা (রো ডিলিট)।
Ctrl+0 : কলাম ডিলিট।
Atl+F1 : ওয়ার্কশিটের সঙ্গে চার্টশিট যুক্ত করা।
Atl+F2 : সেভ অ্যাজ।
Ctrl+F3 : ডিফাইন ডায়ালগ বক্স খোলা।
Ctrl+F4 : ফাইল বন্ধ করা।
Ctrl+F5 : ফাইল নামসহ আদালা উইন্ডো।
Ctrl+F8 : ম্যাক্রো তৈরির জন্য ডায়লগ বক্স খোলা।
Ctrl+F9 : ফাইল মিনিমাইজ করা।
Ctrl+F10 : ফাইল নামসহ আলাদা ইউন্ডো।
Ctrl+F11: ওয়ার্কশিটের সঙ্গে ম্যাকরো শিট যুক্ত করা।
Ctrl+F12 : ওপেন ডায়ালগ বক্স।

ফেসবুক_একাউন্ট_সিকিউরিটি!!


ফেসবুক_একাউন্ট_সিকিউরিটি!!


ফেসবুক আইডি হ্যাক,, কথাটা এখন প্রায় শুনে থাকি,,অনেকেই এক্সেস নেয়!! 


কিন্তু আম জনতা আইডি তে সিকিউরিটি দিতে পারে না,এইজন্যই আইডি হ্যাক হয়!!! 


আমাকে প্রতিদিনই অনেকেই বলে আইডিতে সিকিউরিটি দিবো কিভাবে!!

তাই এই পোস্ট করা!!


আইডি যেভাবে সম্পূর্ন সিকিউর রাখবেন!!! 


১- আইডি এর ডেট অফ বার্থ! (আইডিতে যে ডেট অফ বার্থ দিয়েছেন) হ্যাক/এক্সেসের ক্ষেত্রে বড় ধরনের ভুমিকা পালন করে।


অনেকেই ডেট অফ বার্থ ছাড়া আইডি হ্যাক/এক্সেস নিতে পারে না! তাই আইডিতে ডেট অফ বার্থ হাইড/অনলি মি করে রাখেন! বার্থ শো করানো খুব ইম্পর্টেন্ট হলে সাল টা হাইড রাখবেন!! 


আবার অনেকেই ডেট অফ বার্থ হাইড করে মনে করে আইডি ফুল সিকিউরড!!  নারে ভাই,,,ডেট অফ বার্থ ছাড়াও আইডি হ্যাক/এক্সেস নেওয়া যায়!! কিন্তু অনেকেই পারে না!


২- টু ফ্যাক্টর,,,বা লগ ইন এপ্রুবাল অন!! 

কিছু পাতি মাস্তান তো টু ফ্যাক্টর অন রেখে রিতিমতো চেলেঞ্জ দেয় যে কেওই আইডি হ্যাক/এক্সেস নিতে পারবেনা!!! 


ওরে না রে পাগলা,,, টু স্টেপ বাইপাস করা যায়!! কিন্তু ৫ মিনিট থেকে ১ ঘন্টারমতো সময় লাগে বাইপাস হতে!! 


যদি আপনি টু স্টেপ ভেরিফিকেশন অন রাখেন! তাহলে আইডি হ্যাক হলেও আপনার ফোনে কোড আসবে!!  আপনি বুঝবেন যে কেও আইডিতে ঢুকতে চাচ্ছে!! আর তখন আইডিতে ঢুকে সাথে সাথে সিকিউর করে ফেলবেন! টু স্টেপ এর সুবিধা এইটাই! আগে সেটিংস থেকে পারসোনাল ইনফরমেশন এ যাবেন,, এবং ইমেইল চেক দিবেন,, নতুন ইমেইল থাকলে সাথে সাথে রিমুভ দিবেন!! 


৩- মোস্ট ইম্পর্টেন্ট এইটা!! ট্রাস্টেড কন্টাক্ট অন রাখা!!! 

আইডিতে সবসময় ট্রাস্টেড কন্টাক্ট অন রাখবেন! ৩-৫ জন বন্ধুকে এড রাখা যায়। যারা এইটা এড রাখে না তাদের আইডি হ্যাক হয়!! যদি তার আইডি ভেরিফাই বা ব্লু মার্ক ও করা থাকে তাহলে ও হ্যাক হবে!!! কারন ফেসবুকে কোনো কিছু সাবমিট দিলে তা কোনো ব্যাক্তির দ্বারা যাচাই করা হয় না,,,যাচাই করে কোনো এক সফটওয়্যার স্ক্রিপ্ট! রোবোট বলা যায়!! তাকে ধোকা দিয়েই সাধারনত আইডি এক্সেস/হ্যাক করা হয়!! 


যেভাবে এড করবেন!!


সেটিংস-সিকিউরিটি এন্ড লগইন→চুজ ৩ টু ৫ কন্টাক্টস, লেখা দেখবেন! সেখান থেকে ৩-৫ জন ক্লোজ ফ্রেন্ডের আইডি এড রাখবেন!!! 


৪- লগইন এলার্টস অন রাখবেন!

সেটিংস→সিকিউরিটি এন্ড লগইন অপশন থেকে লগইন এলার্টস অন করে দিবেন!  এতে করে আপনার আইডিতে তে কেও ঢুকতে চাইলে আপনার আইডিতে নোটিফিকেশান আসবে! ম্যাসেজ আসবে!


ধন্যবাদ সবাইকে

Tuesday, November 24, 2020

ওয়েব ডিজাইন এবং ওয়েব ডেভেলপমেন্ট কি?

ওয়েব ডিজাইন এবং ওয়েব ডেভেলপমেন্ট কি? 

ওয়েব ডিজাইন মানে হচ্ছে একটা ওয়েবসাইট দেখতে কেমন হবে বা এর সাধারন রূপ কেমন হবে তা নির্ধারণ করা। 

ওয়েব ডিজাইনার হিসেবে আপনার কাজ হবে একটা পূর্ণাঙ্গ ওয়েব সাইটের টেম্পলেট বানানো। যেমন ধরুন এটার লেয়াউট কেমন হবে। হেডারে, মেনু কোথায় থাকবে, সাইডবার হবে কিনা, ইমেজগুলো কিভাবে প্রদর্শন করবে ইত্যাদি। ভিন্ন ভাবে বলতে গেলে ওয়েবসাইটের তথ্য কি হবে এবং কোথায় জমা থাকবে এগুলো চিন্তা না করে, তথ্যগুলো কিভাবে দেখানো হবে সেটা নির্ধারণ করাই হচ্ছে ওয়েব ডিজাইনার এর কাজ। আর এই ডিজাইন নির্ধারণ করতে ব্যাবহার করতে হবে কিছু টুলস যেমন PHOTOSHOP, GIMP ইত্যাদি এবং কিছু Markup এবং Scripting Language যেমন HTML, CSS এবং JavaScript ইত্যাদি। ওয়েব ডিজাইনারদের কে আমরা Front-end ডেভেলপার ও বলতে পারি। 

আর ওয়েব ডেভেলপমেন্ট হচ্ছে একটা ওয়েব সাইটের প্রাণ সঞ্চার করা। 

একজন ওয়েব ডিজাইনার যে ডিজাইন তৈরি করেন তার প্রতিটা উপকরণকে ফাংশনাল এবং ডাইনামিক করার জন্য পরিচালিত কর্মকান্ডই হচ্ছে Web Development। 

একটা ওয়েব সাইট কে তিনটা ভাগে বিভক্ত করা যায় যেমন ডিজাইন বা টেমপ্লেট, কনটেন্টম্যানেজমেন্ট সিস্টেম এবং ডাটাবেস। 

একজন ওয়েব ডেভেলপার এই তিনটি বিষয়ের মধ্যে সমন্বয় ঘটিয়ে পুরো সিস্টেমটি কে সক্রিয় এবং ডাইনামিক করে থাকেন। 


একজন ওয়েবডেভেলপারের কাজ হচ্ছে ডাটা প্রসেসিং, ডাটাবেস নিয়ন্ত্রণ, সিকিউরিটি নির্মান, ইউজার এবং এডমিনের ক্ষমতা নিয়ন্ত্রণকরা, এপ্লিকেশনের সকল ফিচারকে ফাংশনাল এবং ডাইনামিক করা এবং সমগ্র সিস্টেমের কার্যকারীতা এবং ব্যবহার যোগ্যতা নিয়ন্ত্রণ করা । 


আপনাকে একজন ভালো ওয়েব ডেভেলপার হতে হলে PHP, MySQL এর পাশাপাশি HTML, CSS, JAVASCRIPT, JQUERY, Bootstrap এর সম্পর্কে বিশদ জ্ঞান রাখতে হবে। 

কোনটা শিখবেন? 

ডিজাইন ? 

নাকি ডেভেলপমেন্ট? 

এক কথায় বলব আপনি যদি ক্রিয়েটিভ হন, আপনার চয়েস গুলো যদি হাজার জনের চেয়ে সুন্দর হয় তাহলে আপনি ওয়েব ডিজাইনিং এ ভালো করতে পারবেন। অন্যথায় ওই দিকে না যাওয়া ই ভালো। কেননা মার্কেটে একশ জন ডেভেলপার এর বিপরীতে একজন ডিজাইনার লাগে। তারমানে বুজতেই পারছেন ডিজাইনিং সেক্টর এ প্রতিযোগিতা অনেক বেশি। অন্যদিকে ওয়েব ডেভেলপার হওয়ার জন্য অত বেশি ক্রিয়েটিভ হওয়া লাগেনা। 

একজন ওয়েব ডেভেলপারের কী ধরনের যোগ্যতা থাকতে হয়? 

ওয়েব ডেভেলপার হিসেবে কাজ করতে চাইলে ব্যক্তিগত দক্ষতা বেশি জরুরী। অনেক ক্ষেত্রে শিক্ষাগত যোগ্যতা না থাকলেও ব্যক্তিগত দক্ষতার উপর নির্ভর করে নিয়োগ দেওয়া হয়ে থাকে। তবে ওয়েব ডেভেলপার হিসেবে কাজ করতে চাইলে যোগ্যতার বিষয়টি প্রতিষ্ঠানসাপেক্ষ হলেও সাধারণত কম্পিউটার প্রকৌশল বিষয়ে ব্যাচেলর ডিগ্রি আছে এমন কাউকেই নিয়োগ দেওয়া হয়। কিছু ক্ষেত্রে কম্পিউটার প্রকৌশল বিষয়ে ডিপ্লোমা ডিগ্রি থাকলেও আপনাকে নিয়োগ দেওয়া হতে পারে। অধিকাংশ ক্ষেত্রে তথ্য প্রযুক্তি বা আইটি, কম্পিউটার প্রকৌশল, টেলিকমিউনিকেশন প্রকৌশল বিষয়ে ডিগ্রির কথা উল্লেখ করা থাকে। এর পাশাপাশি অধিকাংশ ক্ষেত্রেই দেখা যায় পুরোনো অভিজ্ঞতা এবং সম্যক ধারণা ও জ্ঞানের উপর ভিত্তি করে নিয়োগ বিজ্ঞপ্তিতে উল্লিখিত ডিগ্রির বিষয়টি নিয়োগের জন্য শিথিল করা হয়। আবার অনেক ক্ষেত্রে দেখা যায় নির্দিষ্ট কোন বিষয় নয় বরং শুধুমাত্র ব্যাচেলর বা মাস্টার্স ডিগ্রি থাকলেই আপনার কোডিং ও প্রোগ্রামিং-এর ধারণার উপর ভিত্তি করে আপনাকে নিয়োগ দেওয়া হবে। এক্ষেত্রে বিষয়টি একেবারেই প্রতিষ্ঠানসাপেক্ষ এবং কম্পিউটার প্রকৌশল বিষয়ে ডিগ্রি না থাকলেও নিয়োগ পেতে পারেন। অধিকাংশ ক্ষেত্রে ডিগ্রির প্রয়োজনীয়তা না থাকলেও কিছু ক্ষেত্রে কম্পিউটার প্রকৌশল বিষয়ে মাস্টার্স ডিগ্রির কথা উল্লেখ করা থাকতে পারে।

ওয়েব ডেভেলপার হিসেবে কাজ করার ক্ষেত্রে অভিজ্ঞতা গুরুত্বপূর্ণ বিষয়। নিয়োগ পাওয়ার জন্য ন্যূনতম ১ বছরের অভিজ্ঞতা অধিকাংশ ক্ষেত্রেই বাধ্যতামূলকভাবে উল্লেখ করা থাকে। কিছু ক্ষেত্রে ৪ থেকে ৭ বছরের অভিজ্ঞতা প্রয়োজনীয় হতে পারে। সাধারণত ১ থেকে ৩ বছরের অভিজ্ঞতা থাকলেই এক্ষেত্রে ওয়েব ডেভেলপার হিসেবে নিয়োগ পাওয়া যায়।

ওয়েব ডেভেলপার হিসেবে কাজ করতে চাইলে নারী বা পুরুষ প্রার্থী নিয়োগের কথা আলাদাভাবে সাধারণত উল্লেখ করা থাকে এবং এ ধরনের কোন বাধ্যবাধকতাও এক্ষেত্রে নেই। নারী এবং পুরুষ উভয়ের জন্যই কাজটি সমান ভার ও অর্থ বহন করে বিধায় নারী-পুরুষ উভয়েই ওয়েব ডেভেলপার হিসেবে কোন প্রাধান্য ছাড়াই কাজ করতে পারেন।

ধরুন আমি তা ভালোভাবেই শিখলাম। পরে কোথায় এবং কিভাবে কাজ করব? 

অনলাইন মার্কেটপ্লেস গুলো যেমনঃ upwork.com, freelancer.com, fiverr.com ওয়েব পেইজ ডিজাইনার এবং ওয়েব ডেভেলপারদের যথেষ্ট চাহিধা রয়েছে। এইসব মার্কেট গুলোতে আপনি সর্বনিম্ন ২ ডলার থেকে ১০০ ডলার পর্যন্ত প্রতি ঘন্টা আয় করতে পারেন। তা ছাড়া themeforest.net, codecanyon.net এর মতো মার্কেট প্লেসে আপনি আপনার তৈরী ওয়েব এপ্লিকেশন গুলো বিক্রি করে প্রতি মাসে লক্ষ টাকা আয় করতে পারেন। এবং বাংলাদেশে হাজার হাজার সফটওয়্যার এবং ওয়েব ডেভেলপমেন্ট কোম্পানি গুলোতে আপনি চাকরিও করতে পারেন। এই সেক্টরে বড় সুবিধা হচ্ছে আপনি কম্পিউটার সাইন্স এ পড়া লেখা না করেও সফটওয়্যার কোম্পানি গুলোতে ভালো স্যালারি তে জব করতে পারবেন। 


নিজে নিজে শিখতে চাইলে কোথায় থেকে শিখব ? 


নিজে নিজে শিখতে চাইলে আপনাকে অবশ্যই অনলাইন থেকে হেল্প নিতে হবে। এই ক্ষেত্রে youtube.com হচ্ছে বেস্ট। 

তাছাড়া ওয়েব ডিজাইন এবং ওয়েব ডেভেলপমেন্ট এর উপর ধারাবাহিক টিউটোরিয়াল পাবেন। 


Web Developer এর মাসিক আয় কেমন? 

একজন Web Developer এর যে কোনো কোম্পানিতে জুনিয়র Web Developer অথবা জুনিয়র Software Engineer থেকে শুরু করে Software আর্কিটেক্ট হিসেবে প্রতিষ্ঠা পেতে পারেন। এ পেশায় প্রাথমিক অবস্থায় খুবই সামান্য বেতন ৫ থেকে ১৫ হাজার টাকা বেতন পাওয়া যায়। এন্ট্রি লেভেলের জব গুলোতে ভালো করলে ২/৫ বছর পর সফটওয়্যার ইঞ্জিনিয়ার এবং সফটওয়্যার আর্কিটেক্ট হিসেবে বেতন ৫০ হাজার থেকে এক লাখ টাকা হতে পারে। পরবর্তীতে বেড়ে তা ২ থেকে ৩ লাখ টাকাও হতে পারে । দক্ষতা ও যোগ্যতা থাকলে দেশের বাইরে রিমোট জবের সুযোগ পাওয়া সম্ভব। দেশের বাইরে রিমোট জবের মাধ্যমে অনেকে ৭-১০ লাখ টাকাও উপার্জন করছেন। 

এ.জে.পি উর্মি আইটি ইন্সটিটিউটে কি ওয়েব ডেভেলপমেন্ট এর উপর কোনো ট্রেনিং করানো হয় ?

জ্বি আমাদের  Professional Web Development Course গুলো হচ্ছে : 

১. Responsive Web Design 

২. WordPress Theme Customization 

৩. Professional Web Development with PHP, MySQL 

৪. WordPress Theme Development 

আর আমাদের Advance Web Development Course গুলো হচ্ছে : 

১. Zend Certified PHP-7.3 Engineering (ZCPE) Course 

২. Laravel 6.0 Beginning To Advance Course with Advance E-Commerce Project 

৩. JavaScript Beginning To Advance With JQUERY and VueJS

HTML, CSS, PHP, MYSQL, Javascript – কোর্সঃ-ওয়েব ডেভেলপমেন্ট


কোর্সঃ- ওয়েব ডেভেলপমেন্ট – HTML, CSS, PHP, MYSQL, Javascript. 

কোর্স ফিঃ- সূম্পুর্ন বিনামূল্যে। 

রেজিষ্ট্রেশন করার নিয়মঃ- নামঃ- 
শিক্ষা যোগ্যতাঃ- 
মোবাইল নাম্বারঃ- 
ইমেইল এড্রেসঃ- 
উইন্ডোজ ভার্সনঃ- 
আমাদের চ্যানেল সাবস্ক্রাইব করুন। 

কোর্সের সংক্ষিপ্ত বর্ণনাঃ- ওয়েব ডেভেলপমেন্ট শেখার জন্য HTML , CSS জানা জরুরি। PHP অনেক সহজে শেখা যায়।  PHP তে অনেক বেশি ফ্রীলান্সিং কাজ পাওয়া যায় freelancer.com,  odesk.com এ। এই কোর্স এ বেসিক থেকে এডভান্স লেভেলে ডেভেলাপমেন্ট এর পাশাপাশি অনুশীলন করব।  PHP এর সাথে এই কোর্সে জাভাস্ক্রিপ্ট এবং MySQL শেখানো হবে। কোর্স শেষে ৫০ টি ডোমেইন ফ্রিতে দেওয়া হবে এবং একটা পরিপূর্ণ ওয়েবসাইট ডেভেলপ করা হবে। 

কাদের জন্য এই কোর্সঃ- সবার জন্য – অবশ্যই ওয়েব ডেভেলপমেন্ট করার ইচ্ছা থাকতে হবে। 

কোর্সটি কোথায় পাবেনঃ- আমাদের পেইজে এবং ইউটিউব চ্যানেলে ধারাবাহিক টিউটোরিয়াল পাবেন।    
কোর্সে কয়টি লেকচার থাকবেঃ- ৬০+  প্রতি সপ্তাহে ৩ অথবা তার চেয়ে বেশি কোর্স থাকবে। 

কোর্সের সিলেবাসঃ- 
১. HTML কি এবং কেন? 

২. HTML শেখার জন্য রেকুইরেমেন্ত 

৩. ইনস্টল Sublime Text 

৪. Hello World # কিভাবে ফাইল এক্সটেনশন পরিবর্তন করা যায় 

৫. HTML হেডিং element 

৬. HTML প্যারাগ্রাফ element 

৭. HTML bold italic underline 

৮. HTML em element 

৯. HTML strong element 

১০. HTML sub sup del element 

১১. HTML anchor element 

১২. HTML image element 

১৩. HTML image এবং anchor এলিমেন্ট

১৪. HTML list এলিমেন্ট 

১৫. HTML Table এলিমেন্ট 

১৬. HTML Form এলিমেন্ট 

১৭. HTML Form Submit 

১৮. HTML Inline vs Block এলিমেন্ট 

১৯. HTML Iframe এলিমেন্ট 

২০. HTML পোস্ট মর্টেম 

২১. HTML কোর্স conclusion ## END of HTML #### ২২. ওয়েবসাইট কনসেপ্ট – ডোমেইন & হোস্টিং ২৩. ওয়েবসাইট কনসেপ্ট – Website Vs Mobile 

২৪. ওয়েবসাইট কনসেপ্ট – ফ্রি ডোমেইন এবং হোস্টিং 

২৫. ওয়েবসাইট কনসেপ্ট – কন্ট্রোল প্যানেল (cpanel) 

২৬. ওয়েবসাইট কনসেপ্ট – সার্ভার এ ফাইল ট্রান্সফার (FTP) 

২৭. ওয়েবসাইট কনসেপ্ট – DNS – ডোমেইন নেম সার্ভার 

২৮. ওয়েবসাইট কনসেপ্ট – .COM ডোমেইন কেনার উপায় 

২৯. CSS – কোর্স প্রি লেকচার 

৩০. CSS কি ? 

৩১. CSS কোর্স এর জন্য কি কি প্রয়োজন? 

৩২. CSS দিয়ে style এর শুরু 

৩৩. HTML থেকে কিভাবে CSS আলাদা ভাবে লেখা যায় 

৩৪. স্টাইল এর জন্য CSS ফাইল 

৩৫. কিভাবে CSS এ Font ব্যবহার করা হয় 

৩৬. CSS দিয়ে টেক্সট এর Color পরিবর্তন কর 

৩৭. CSS এর ID (ভোটার আইডি না) 

কোর্স কবে থেকে শুরু হবেঃ- কোর্সটি  ১৭-১২-২০২০ থেকে শুরু হবে।    

Sunday, November 22, 2020

A.J.P Urmi IT Institute offers some courses for online learning platform.

"A.J.P Urmi IT Institute Learning Home" offers some courses by distance to students through the "A.J.P Urmi IT Institute Learning Home" online interactive learning platform, using a blended learning approach. Distance courses you successfully complete can count towards a university degree, in the same way as a regular campus-based course. Depending on your course selection, an entire Bachelor of Arts can be completed by distance.


A list of courses you can take as part of a qualification by distance. 

.NET (12)

100D (1)

1Password (2)

3ds Max (79)

5D (2)

60D (1)

6D (1)

7D Mark II (1)

A+ (19)

Ableton Live (22)

Absynth (2)

Access (46)

AccountRight (1)

Accubid (8)

AccuDraw (1)

ACDSee (1)

ActionScript (2)

Active Directory (6)

Adobe Acrobat (20)

Adobe Analytics (1)

Adobe Animate (17)

Adobe Color (2)

Adobe Connect (1)

Adobe Mobile Apps (5)

Adobe Portfolio (1)

Adobe Spark (4)

Adobe XD (29)

AdSense (1)

Adwords (3)

Affinity Designer (4)

Affinity Photo (3)

After Effects (240)

Airbnb (1)

Airtable (1)

Ajax (2)

Alias (2)

ALM/TFS (1)

Alpha a7 (1)

Altium Designer (1)

Amazon Associates (1)

Amazon EC2 (4)

Amazon Marketplace (1)

Amazon SageMaker (2)

Amazon Web Services (123)

AmpliTube (1)

Analog Efex Pro (1)

Analytics (1)

Analytics Cloud (1)

Android (57)

Android SDK (1)

Android Studio (2)

Angular (43)

Animation Composer (1)

Ansible (6)

Antivirus (1)

Apache (3)

Apache Cordova (2)

Apache JMeter (2)

Apache Spark (8)

Aperture (7)

Apex (1)

Apollo (1)

Appium (1)

Apple Color (1)

Apple Photos (6)

Apple TV (1)

Apple Watch (1)

ArcGIS (4)

ArchiCAD (3)

Arduino (6)

Articulate 360 (2)

Articulate Studio (4)

ArtRage (1)

Asana (1)

ASP.NET (21)

ASP.NET Core (23)

ASP.NET Core MVC (1)

ASP.NET MVC (7)

ASP.NET Web API (6)

ASP.NET Web Forms (1)

Atom (1)

Audacity (4)

Audition (17)

Auria (1)

Auria Pro (1)

Aurora HDR (1)

Auto-Tune (1)

AutoCAD (88)

AutoCAD Architecture (3)

AutoCAD Civil 3D (19)

AutoCAD Electrical (2)

AutoCAD for Mac (14)

AutoCAD LT (7)

AutoCAD MEP (3)

AutoCAD mobile app (1)

AutoCAD P&ID (2)

AutoCAD Plant 3D (2)

Autodesk 360 (2)

Automation Anywhere Enterprise (2)

AWS CloudFormation (2)

AWS QuickSight (1)

Axure (5)

Azure (161)

Azure Active Directory (9)

Azure Sentinel (1)

Backbone.js (1)

Backburner (1)

Bamboo (1)

Basecamp (1)

Bash (4)

Battery (2)

Behance (4)

Behat (1)

BIM 360 (5)

BIM 360 Field (1)

BIM 360 Ops (1)

Bing Ads (2)

Bing Search (1)

Bitcoin (1)

Bitnami (1)

Bitwig Studio (1)

Blackboard (4)

Blackmagic Design Fusion (4)

Blazor (1)

Blender (32)

Blue Prism (2)

Bluebeam (6)

Bluebeam Extreme (1)

Bluebeam Revu (2)

BlueJeans (1)

Bookings (1)

Bootstrap (6)

Box (4)

Bridge (5)

Business Catalyst (1)

C (12)

C# (44)

C++ (16)

CakePHP (2)

Camera Raw (17)

CameraTracker (1)

Camtasia (23)

Canva (3)

Canvas (6)

Captivate (27)

Captivate Prime (2)

Capture NX2 (1)

Capture One (2)

Capture One Pro (10)

Cassandra (3)

CATIA (4)

CentOS (9)

Chaos Kong (1)

Chaos Monkey (1)

Chaos Toolkit (1)

Character Animator (1)

Chef (2)

Chef Development Kit (2)

Chrome (3)

Chrome OS (1)

Chromebook (1)

Chromebox (1)

CINEMA 4D (95)

Cinemagraph Pro (2)

Cisco (19)


Saturday, November 21, 2020

একজন স্বয়ংসম্পূর্ণ ওয়েব ডেভেলপারের পরিপূর্ণ গাইডলাইন

একজন স্বয়ংসম্পূর্ণ ফুল স্ট্যাক ওয়েব ডেভেলপার হতে গেলে যা যা শিখতে হবে এবং যেভাবে শিখতে হবে তার পরিপূর্ণ গাইডলাইন


ফুল স্ট্যাক ওয়েব ডেভেলপার মানে হলো, যারা ওয়েব ডিজাইন এবং ডেভেলপমেন্ট দুটোতেই সমান পারদর্শী। এটার মূলত তিন লেভেলঃ-


যা যা শেখা লাগবেঃ


ওয়েব ডিজাইনঃ

১. এইচটিএমএল ৫ - HTML 5

২. সিএসএস ৩ - CSS 3

* এতটুক দিয়েই একটি JPG to HTML রেস্পন্সিভ ওয়েবসাইট ডিজাইন পিওর সিএসএস দিয়ে করতে হবে

৩. বুটস্ট্র‍্যাপ ৪ - Bootstrap 4

৪. এডোবি ফটোশপ - Adobe Photoshop

* এই অংশে একটি PSD to HTML রেস্পন্সিভ ওয়েবসাইট ডিজাইন বুটস্ট্র‍্যাপ দিয়ে করতে হবে

৫. জাভাস্ক্রিপ্ট - Javascript (এই অংশে প্রোগ্রামিং শিখবেন না, শুধুমাত্র ডোম মেনিপুলেশন এবং ইভেন্ট হ্যান্ডলিং গুলো শিখবেন)

৬. জেকুয়েরি ৩ - JQuery 3 থার্ড পার্টি প্লাগিন

* এই অংশে নিজেদের জন্য একটি পোর্টফলিও ওয়েবসাইট ডিজাইন করবেন উপরোক্ত সব কিছুর মিশ্রনে


ওয়েব ডেভেলপমেন্টঃ

৭. সি প্রোগ্রামিং - C Programming 

প্রোগ্রামিং-এর ভিত্তিতে সম্পূর্ন ওয়েব ডেভেলপমেন্ট অংশটি হওয়ার কারনে যারা প্রোগ্রামিং এ একদমই নতুন এবং অজ্ঞ, তাদের জন্য আমার মতে আগে সি প্রোগ্রামিং শেখা উচিত

৮. মাইএসকিউএল - MySQL

৯. পিএইচপি - PHP (এই অংশে শুধু স্ট্রাকচারাল প্রোগ্রামিং-ই শিখবেন)

এবার অনেকেই ভাবছেন, ডেভেলপমেন্ট করার জন্যে তো পিএইচপি হলেই চলবে, একই অংশে দুটো ( সি & পিএইচপি) প্রোগ্রামিং ল্যাঙ্গুয়েজ কেন? অনেকেই পিএইচপি দিয়ে ডেভেলপমেন্ট শেখার পর অন্য কোনো প্রোগ্রামিং ল্যাঙ্গুয়েজ প্রজেক্ট বা অফিসের খাতিরে শেখার প্রয়োজন হলে, তারা ভয়ে পিছপা হয়ে যায়। কেননা অন্যান্য ল্যাঙ্গুয়েজগুলো পিএইচপি'র মতো ফ্লেক্সিবল আর সহজ না। কিন্তু আমি চায়, সবারই একজন ভার্সেটাইল প্রোগ্রামার হওয়া উচিত, যাতে কোনো স্তরে গিয়ে কাউকে থমকে যেতে না হয়। এবং এই জন্যেই আমি মনে করি আগে সি শিখে তারপর পিএইচপি শেখা উচিত।

১০. এজাক্স - Ajax


* ওয়েব ডিজাইন ডেভেলপমেন্টের উপরোক্র সবগুলো সেগমেন্ট শেষ করে এবার সময় এসেছে একটি মেগা কম্বো প্রজেক্ট তৈরি করার। তাই এই অংশে এসে নিজেদের জন্য একটি কনটেন্ট ম্যানেজমেন্ট সিস্টেম তৈরি করবেন


এই স্টেজে এসে আপনি চাইলে নিজেকে ওয়েব ডিজাইনার ডেভেলপার বা ফুল স্ট্যাক ওয়েব ডেভেলপার বলতে পারবেন এবং সার্কুলার খুজে জবও পেয়ে যাবেন ইনশাআল্লাহ, কিন্তু আপনি হচ্ছেন এখন একজন লো লেভেল ওয়েব ডেভেলপার।


এবার আমরা দেখব আপনাকে মিড লেভেল ওয়েব ডেভেলপার হওয়ার আরো কি কি শেখা লাগবেঃ

১১. পিএইচপি - PHP ( এই অংশে অবজেক্ট ওরিয়েন্টেড প্রোগ্রামিং শিখবেন )

* এবার একটি সোস্যাল মিডিয়া ওয়েবসাইট ডিজাইন করে তারপর পিএইচপি তে অবজেক্ট ওরিয়েন্টেড এপ্রোচে তা ডেভেলপ করবেন

১২. MVC

* এই অংশে নিজেদের জন্য Custom MVC Framework বানিয়ে ব্যাসিক ফাংশনালিটির একটি প্রজেক্ট তৈরি করবেন

১৩. লারাভেল - Laravel

* লারাভেল শিখেই একটি Human Resource Management System তৈরি করতে পারেন

১৪.  এপিআই - API

* বিভিন্ন ধরনের API শিখে ছোটখাট প্রজেক্ট বানিয়ে সেগুলো ইমপ্লিমেন্ট করতে হবে

১৫. গিট - Git


এখন আপনি এমন এক স্টেজে পৌছে গেছেন যেখানে নিজেকে একজন মিড লেভেল ফুল স্ট্যাক ওয়েব ডেভেলপার হিসেবে দাবী করতে পারবেন এবং সার্কুলার অনুযায়ী প্রয়োজনীয় নতুন যা যা শেখার প্রয়োজন খুবই অল্প দিনেই আয়ত্বে নি আসতে পারবেন।। যেহেতু এখন আপনি নতুন যে কোনো কিছু শিখতে প্রস্তুত আপনার জন্য নেক্সট লেভেলে যাওয়া শুধু সময়ের ব্যাপার এবং এক্সপেরিয়েন্স অগ্রাধিকারযোগ্য


উপরের সব স্টেপ কমপ্লিট করে আসলে, আপনার কাছে জব ইন্টারভিউতে দেখানোর জন্য যা যা থাকবেঃ

১. JPG to HTML Website

২. PSD to HTML Website

৩. Portfolio Website ( মূলত এটা এমনভাবে ডিজাইন করতে হবে, যাতে পরবর্তীতে সেখানে নিজের করা সব প্রজেক্ট সাজিয়ে রাখা যায় এবং তা জব ইন্টারভিউয়ে অতি গর্বের সহিত দেখানো যায় )

৪. Content Management System( মূলত এটা এমনভাবে ডিজাইন & ডেভেলপ করতে হবে, যাতে সেটাকে নিজস্ব ব্লগ হিসেবে ব্যবহার করা যায় এবং বিভিন্ন আর্টিকেল পাবলিশ করা যায় )

৫. Social Media Website ( এটাও এমনভাবে ডিজাইন & ডেভেলপ করতে হবে, যাতে সেটাকে ব্লগ ফোরাম বা ফেসবুকের মতো ফিচার'স সম্বলিত ওয়েবসাইট হিসেবে ব্যবহার করা যায় )

৬. Customized MVC Framework

৭. Human Resource Management System ( এই সিস্টেমটিও এমনভাবে ডিজাইন & ডেভেলপ করবেন, যাতে এটা দিয়েই বিভিন্ন কোম্পানীর সমগ্র হিসাবনিকাশের কাজ করে ফেলা সম্ভব হয় )

৮. Mini Projects of Various API

এছাড়াও ছোটখাট আরো অনেক প্রজেক্ট বিভিন্ন টপিক রিলেটেড বানিয়ে সেগুলো গিটের মাধ্যমে ম্যানেজ করবেন এবং ইন্টারভিউতে এসব শো করাবেন


শিখবেন কোত্থেকেঃ

টপিক স্পেসিফিক ধরে ধরে ইউটিউবে ভিডিও টিউটোরিয়াল অথবা গুগল সার্চ করে বিভিন্ন অনলাইন কোর্সও করতে পারেন। যদি খুজে না পান কমেন্টে জানান অথবা গ্রুপে পোষ্ট করুন। কোর্স সেন্টারে যাবেন একদম শেষ পর্যায়ে এসে যখন দেখবেন টিউটোরিয়াল দিয়ে আপনার শেখার ঘাটতি পূরন হচ্ছে না


শিখতে কত সময় লাগবেঃ

যদিওবা কোনোকিছু শেখা একজন ব্যক্তির নিজস্ব শিখনক্ষমতার উপর নির্ভর করে, তবুও যে কেউ যদি প্রতিদিন একটি নির্দিষ্ট সময় নিয়ে ধাপে ধাপে কাজগুলো শিখে তবে তার ৬মাস বা ১বছর লাগতে পারে। ইন্টারমিডিয়েট ২ বছর, ডিপ্লোমার ৪ বছর অথবা বিএসসির ৩-৪বছর যে কোনো পিরিয়ডে গিয়েই পড়ালেখার পাশাপাশি স্কিলগুলো ডেভেলপ করে ফেলতে পারলে, ফাইনাল শেষে জবের জন্য তাকে খুব বেশিদিন বসে থাকতে হবেনা


এনাউন্সমেন্টঃ

খুব শিঘ্রই পোস্টের মতো সাজানো গোছানো একটি কমপ্লিট ভিডিও কোর্স আপনাদের সবার জন্য ফ্রিতে অবমুক্ত করব, যেখানে উপরোক্ত সবগুলো টপিক এবং প্রজেক্ট ধাপে ধাপে তৈরি করা শেখানো হবে। কোর্সটি আমি ইউটিউব চ্যানেলে আপলোড দিব কিন্তু তার আগে আপনারা কিছু নাম সাজেস্ট করুন যেটা আমি চ্যানেলের নাম হিসেবে দিতে পারব। অন্য কোনো প্রশ্ন বা মতামত থাকলে চলে আসুন কমেন্ট বক্সে।

Tuesday, November 17, 2020

জেনে নিন ফেসবুক শর্টকাট।

 জেনে নিন ফেসবুক শর্টকাট শেয়ার করে টাইলাইনে রেখে দিন কাজে আসবে। 

নিত্যদিন ফেসবুক ব্যবহার করলেও অনেকেই জানেন না এর  খুঁটিনাটি।  কত অপশন রয়েছে সেটিংসে সেকথাও অনেকেরই অজানা।


মনে করেন, কেও যদি আপনার ফেসবুক প্রোফাইল পিকচার এ কমেন্ট করতে চায় ,  কি বোর্ডে c প্রেস করলেই চলে খুলে যাবে কমেন্ট বক্স।  আবার শুধু s দিলেই কোনও পোস্ট শেয়ার হয়ে যাবে আপনার ওয়ালে। এমনই একাধিক শর্ট কাট রয়েছে।


জেনে নিন সেইসব শর্ট কাট:
j , k — Scroll between News Feed stories; p — Post a new status;
 l — Like or unlike the selected story; c — Comment on the selected story;s — Share the selected story; o — Open attachment of the selected story;enter — See More of the selected story; / — Search; q — Search chat contacts


এতো গেল কোনও একটি লেটার দিয়ে যেগুলি করা যাবে। এমন  কিছু পদ্ধতিও রয়েছে যাতে এক নিমেষেই আপনি পৌঁছে যাবেন আপনার ফ্রেন্ডলিস্টে। 

দেখে নিন সেগুলি:
Alt + Shift + 0 — Help; Alt + Shift + 1 — Home; Alt + Shift + 2 — Timeline;Alt + Shift + 3 — Friends; Alt + Shift + 4 — Inbox;
 Alt + Shift + 5 — Notifications; Alt + Shift + 6 — Settings; 
Alt + Shift + 7 — Activity Log; Alt + Shift + 8 — About;
 Alt + Shift + 9 — Terms; Alt + Shift + m — New Message

ডিলেট হয়ে যাওয়া ফেসবুক মেসেজ ফিরিয়ে আনুন.!!


ফেসবুক আমাদের জন্য একটি আলাদা জগত স্থান লাভ করে ফেলেছে। ইন্টারনেট ব্যাবহার করে কিন্তু ফেসবুক ব্যাবহার করে না আমাদের দেশে এমন মানুষ পাওয়া খুবই দুষ্কর।  অনেক সময় আমরা প্রয়োজনীয় অনেক মেসেজ আদান প্রদান করে থাকি ফেসবুকের মাধ্যমে। কিন্তু ভূলে ডিলেট ও হয়ে যায় অনেক তথ্য।
মেমোরি কার্ডের ছবির মতো ফেসবুকের মেসেজ ও পাওয়া যায়। চলুন, জেনে নেই কিভাবে ডিলেট হওয়া ফেসবুক মেসেজ ফিরিয়ে আনা যাবে।

প্রথমে ফেসবুকের সেটিংস অপশনে প্রবেশ করুন। https://www.facebook.com/settings
এখানে Download a copy ক্লিক করে আবেদন করুন। আপনার ই-মেইলে আপনার ফেসবুকের একটি কপি পাঠিয়ে দেওয়া হবে।


এবার জিপ ফাইলটি ডাউনলোড করে ওপেন করুন। সেখানের HTML ফোল্ডারে লগিন করলে দেখতে পাবেন messages.htm নামের একটি ফাইল রয়েছে। সেখানেই গচ্ছিত রয়েছে আপনার ফেসবুকের মেসেজ গুলো। 


আশা করি ট্রিকসটি অনেকের উপকারে আসবে। 
এরকম আরও  তথ্য পড়তে ভিসিট করুন: এখানে   


যে কোন মোবাইল নাম্বারের তথ্য বের করুন।

কোন নাম্বার থেকে মিসকল / থ্রেটকল / হুমকি কিংবা অশ্লীল বার্তা পেয়ে থাকলে যেভাবে খুঁজে বের করবেন।

কোন নাম্বার থেকে মিসকল / থ্রেটকল / হুমকি কিংবা অশ্লীল বার্তা পেয়ে থাকলে ব্লক করে দেওয়াকেই আমরা সমাধান মনে করে থাকি। এক্ষেত্রে অপরাধীরা অপরাধ করেও রয়ে যাচ্ছে ধরা ছোয়ার বাইরে, আমাদেরকে বানাচ্ছে বোকা।
আসুন, আমরা জেনে নিচ্ছি ওপেন সোর্স ইন্টিলিজেন্স এর মাধ্যমে আপনি নিজেই কিভাবে তার মোবাইল নাম্বারের তথ্য খুঁজে বের করবো তা নিয়ে বিস্তারিত।
১ম কাজঃ প্রথমে "True caller" নামে গুগল প্লে স্টোরে জনপ্রিয় একটি এপস রয়েছে , সেটা ডাউনলোড করে নেট কানেকশন অন করে নাম্বারটা লিখলে আপনি তার নাম পেয়ে যাবেন। 
তবে, অবশ্যই ইন্টারনেট সংযোগ চালু রেখে সার্চ করতে হবে। আমাদের অনেকের ই ধারণা ট্রু কলার ভালো ভাবে কাজ করে না... কিন্তু সত্যিকার অর্থে আমরা ইন্টারনেট সংযোগ বন্ধ থাকে বিধায় কোন অপরিচিত নাম্বার থেকে কল আসলে তার তথ্যাবলী পাই না।

ট্রু কলার ছাড়াও "EYECON" নামে আরো একটি কার্যকরী এপস আছে প্লে স্টোরে। ব্যাবহার করে দেখতে পারেন।


২য় কাজঃ নাম্বারটি ফেসবুক মেসেঞ্জারে সার্চ করে আপনি কিন্তু তার প্রোফাইল লিংকটাও পেয়ে যাবেন।
ফেসবুকে নাম্বার দিয়ে সার্চ করার অপশনটি বন্ধ করে দিয়েছে। কিন্তু নাম্বারটি যদি ফেসবুক মেসেঞ্জার দিয়ে সার্চ করলে সেই নাম্বারে কোন ফেসবুক আইডি থাকলে পেয়ে যাবেন। [৯৫% ক্ষেত্রেই নাম্বারের ক্ষেত্রে ফেসবুক আইডি পাওয়া যায়।]
ছবিতে লাল অংশে আপনি আপনার নির্দিষ্ট মোবাইল নাম্বারটি লিখলেই সেই নাম্বারের সাথে যুক্ত থাকা ফেসবুক আইডিটিতি পেতে পারেন। 

এবার আপনি নিন্মোক্ত পদ্ধতি গুলো অনুসরণ করে ফেসবুক থেকেই তার Location / অবস্থান খুঁজে বের করতে পারবেন।
💻 ফেসবুকে যদি কেউ হুমকি দেয় কিংবা অশ্লীল বার্তা পাঠায় অথবা ফেক আইডি খুলে তাহলে তাকে খুঁজে বের করার উপায়।
প্রথমে, grabify.link ওয়েবসাইটে গিয়ে যে কোন একটি ছবিকে সংযুক্ত করুন। [খুবই সহজ কার্যপদ্ধতি]
অতঃপর, লিংকটি টার্গেটকে পাঠিয়ে দিলে টার্গেট ক্লিক করার সাথে সাথেই আপনি তার আইপি এড্রেস পেয়ে যাবেন।

আইপি এড্রেস থেকে কিভাবে তার বাসার ঠিকানা খুঁজে বের করবেন এই নিয়ে চিন্তায় আছেন। তাই তো?
এটাও খুঁজে বের করতে পারবেন সহজেই।
whatismyipaddress.com/ip-lookup ওয়েবসাইটে গিয়ে আইপি লিখলেই আপনি গ্রাহকের ইন্টারনেট সার্ভিস প্রোভাইডারের তথ্যাবলী সহ ম্যাপে তার অবস্থান পেয়ে যাচ্ছেন।
[আপনার আইপি দিয়েই একটা ট্রাই করে দেখুন।] 
ওহ হো, বলতেই ভূলে গিয়েছি। কিভাবে আপনার আইপি খুঁজে বের করবেন সেটাই তো জানানো হয় নি।
খুবই সহজ। গুগলে গিয়ে what is my ip লিখে সার্চ করলেই চলে আসবে আপনার আইপি এড্রেসটি।
এবার টার্গেটের আইপি এড্রেস সহ বাসার ঠিকানা পেয়ে গেলে একসাথে গিয়ে চা - পানি খেয়ে আসুন।

Tuesday, November 10, 2020

The Excel Ribbon A To Z

Add caption

The Excel  Ribbon is one of the first topics covered on our Introduction to Excel. Ribbon, first introduced with Microsoft Office 2007, is the key component of the Excel interface and offers access to most of its features, facilities and utilities. However, as is now the case with all sophisticated software packages, there are often several other ways of accessing Excel’s features and bypassing the Ribbon.

Screen Clipping

The Ribbon consists of a series of tabs, each of which offers commands related to a certain theme. These commands are further subdivided into Groups, with the name of each Group displayed at that the bottom of the Ribbon.

The Ribbon is a very honest and open interface: basically, everything is laid out for you: the simple, the intermediate, and the advanced; it’s all there; nothing is hidden. There follows a brief description of each of the Ribbon Tabs and the Groups of controls found in each one. I’d recommend that you take some time reviewing the various Tabs: this will help in the process of demystifying Excel and making it seem less daunting.

Watch out for the launcher buttons

In the bottom right-hand corner of some Ribbon Groups, you will notice a tiny icon consisting of a rectangle with an arrow. As you browse through the Ribbon Tabs, keep an eye out for these rather inconspicuous buttons. They are called launcher buttons and what they usually launch are the rich and powerful Excel dialog boxes, many of which have been part of Excel for ages. For example, on the Home Tab, the Clipboard, Font, Alignment and Number Groups each contain a launcher button (See figure 1-19, below).
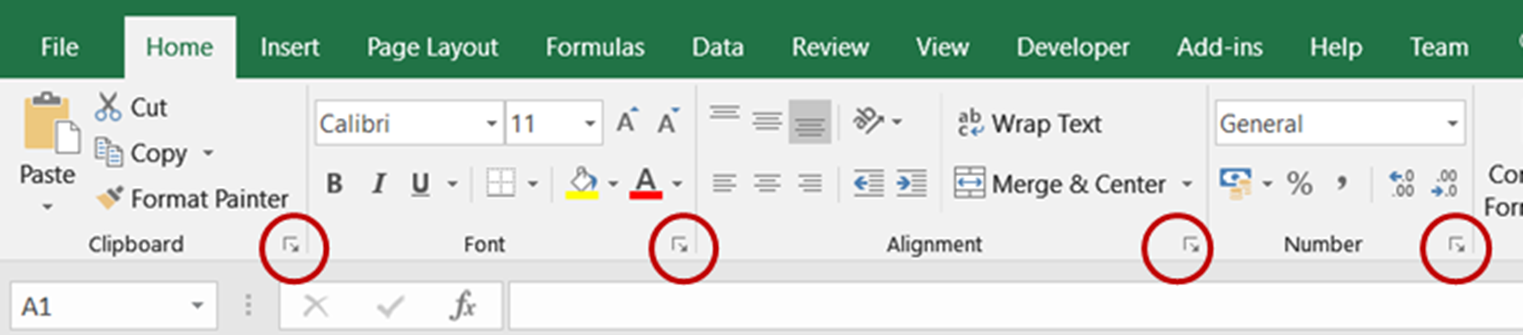
Launcher buttons are found in the bottom right of some Ribbon Groups and normally display a dialog box containing a detailed series of options.

Clicking on these launcher buttons will be particularly reassuring for those of you who have upgraded to Excel 2016 straight from version 2003, or earlier; since it will help you to realize that your existing skill set is still very relevant to this latest version.

The Home Tab

Screen Clipping

The Home Tab of the Excel Ribbon contains those essential editing and formatting commands which one uses all the time.

The Clipboard Group offers the long-winded way of performing the common clipboard operations: Cut, Copy and Paste. (Most people prefer to use keyboard shortcuts (Control-X, Control-C and Control-V) or to choose these commands from the right-click menu).

The Excel Ribbon The Clipboard Group contains a launcher button which displays the Office Clipboard, in a task pane on the left of the screen. The Office Clipboard keeps track of up to 24 copied items at a time and allows you to paste any of them. It can come in quite handy when building complex Excel formulas.

The Font Group allows you to change the stylistic appearance of the text you enter into your spreadsheets such as its font, size and colour.

The Excel Ribbon The Font Group contains a launcher button which displays the Format Cells dialog box, with the Font tab activated.

The Alignment Group provides commands for rotating and wrapping text—very useful for long headings—merging cells and controlling both horizontal and vertical alignment.

The Excel Ribbon The Alignment Group contains a launcher button which displays the Format Cells dialog box, this time with the Alignment tab activated.

The Excel Ribbon The Number Group provides options for data formatting—for example, controlling the number of decimal places shown with numbers, and the way in which dates are to be displayed.

The Excel Ribbon The Number Group contains a launcher button which displays the Format Cells dialog box, this time with the Number tab activated.

The Excel Ribbon The Styles Group provides automatic formatting options—in contrast to the manual formatting offered by the Font Group. These options include Excel’s powerful conditional formatting commands.

The Excel Ribbon The Cells Group provides commands for manipulating cells, columns and rows: such things as inserting, deleting and specifying widths and heights. It also contains options for hiding, moving and protecting the sheet as a whole.

The Excel Ribbon The Editing Group has a variety of popular commands for entering and modifying cell data. The AutoSum tool is used to rapidly create simple formulas with just one or two clicks. The Sort & Filter button can be used for quickly sorting data by the column in which the cursor is positioned. The Group also contains options for deleting, finding and replacing data.

The Insert Tab

The Insert Tab of the Excel Ribbon contains options for superimposing elements onto a worksheet which differ from the normal cell contents—items such as charts, imported images and vector graphics.

Screen Clipping

The Insert Tab is mainly used for creating graphic elements which are not contained by the cells of the worksheet.

The Excel Ribbon The Tables Group allows you to create Excel tables (which are used to store columnar data) and pivot tables (which are used for data analysis). Although pivot tables store their data within worksheet cells, they then prohibit normal access to those cells; the cells within a pivot table cannot be individually edited.

The Excel Ribbon The Illustrations Group contains options for adding bitmapped and vector graphics to Excel. Images can be inserted from a local drive or via the web: there is even the option of searching for images using Bing. Vector images can be drawn within Excel using the Shapes and Smart Art buttons. The Screenshot button allows you to grab any part of any window currently open on your computer screen.

The Excel Ribbon The Apps Group lets you access Microsoft apps for Office solutions. Apps for office resemble iPhone and Android apps: they are essentially web pages which Excel (or any other Office program) can host; and which provide some useful functionality or service not native to the program.

The Excel Ribbon The Charts Group allows you to add Excel charts and pivot charts to your worksheet. A pivot chart is simply a chart which uses a pivot table as its data .source, rather than a regular Excel data range.

The Excel Ribbon The Charts Group contains a launcher button which displays the same dialog as is shown when you click the Recommended Charts button.

The Excel Ribbon The Reports Group contains just one item: the Power View button. Power View is a built-in Excel add-in which just needs to be activated. It allows you to create stunning business visualizations driven by the new Excel Data Model.

The Excel Ribbon The Sparklines Group allows you to insert sparklines in your worksheets. Sparklines are miniature charts which are displayed within cells, usually adjacent to the data they plot, and which provide handy visual clues regarding trends.

The Excel Ribbon The Filters Group contains buttons for adding slicers and timelines to tables, pivot tables and pivot charts. Both of these elements provide a highly interactive mechanism for filtering structured data. Slicers can be used with any data type; while timelines can only be used to filter dates.

The Excel Ribbon The Links Group contains only the Hyperlink button. Hyperlinks work in pretty much the same way in all of the Microsoft Office products. In Excel, you can place a hyperlink on any cell, or range of cells; which takes the user to another worksheet, opens a different workbook, creates a new email message, or goes to a web URL.

The Excel Ribbon The Text Group allows you to insert text based elements which reside on the object layer, above the worksheet cells. You can add text boxes, headers and footers, Word Art, signature lines and use Microsoft’s Object Linking and Embedding (OLE) technology to insert objects.

The Excel Ribbon The Symbols Group has options for inserting equations and symbols. Symbols can be inserted like any other character, inside a cell. However, equations are inserted in a text box on the object layer, on top the worksheet cells. Excel provides a sophisticated Equation toolbar for editing equations, containing dozens of mathematical and scientific symbols and constructs.

The Page Layout Tab

The Page Layout Tab of the Excel Ribbon contains options for controlling the appearance of your worksheets as a whole. Here, you’ll find settings relating to margins, orientation, size of paper, and the area of the worksheet to be printed. You will usually go to the page layout Tab before printing worksheets.

Screen Clipping

The Page Layout Tab contains all of the options relating to Page Setup.

The Excel Ribbon The Themes Group allows you to make use of the built-in Themes feature now common to all Microsoft Office products. Themes provide a simple and quick method of controlling the format of an entire document. Choosing options from the Themes, Colors, Fonts and Effects drop-down menus, found in the Themes Group, can change the appearance of worksheet cells and graphic objects in one hit, using tasteful and well-coordinated tones.

The Excel Ribbon The Page Setup Group contains the commands that you normally need to use before printing a document: for example, changing the margins, orientation and page size; or specifying a print area (whereby only a portion of the worksheet will be printed).

The Excel Ribbon The Page Setup Group contains a launcher button which displays the Page Setup dialog box with the Page tab activated.

The Scale to Fit Group simply contains the commands found in the Scaling section of the Page tab of the Page Setup dialog.

The Excel Ribbon The Scale to Fit Group contains a launcher button which displays the Page Setup dialog box, also with the Page tab activated.

The Excel Ribbon The Sheet options Group contains options for hiding and showing gridlines and column and row headings, both on screen and at print time.

The Excel Ribbon The Sheet Options Group contains a launcher button which displays the Page Setup dialog box, this time with the Sheet tab activated.

The Excel Ribbon The Arrange Group is encountered in several different Tabs. It provides a series of commands allowing you to align and arrange objects: such as Bring to Front, Send to Back and Group.

The Formulas Tab

The Formulas Tab of the Excel Ribbon contains commands for dealing with one of the most powerful features of Excel: formulas and functions. Here you can insert functions, track down errors in formulas and control the way in which Excel deals with formulas and carries out its calculations.

Screen Clipping

The Formulas Tab contains Excel’s main options for creating, displaying and auditing formulas and determining how the program performs worksheet calculations.

The Excel Ribbon The Function Library Group allows you to insert any of Excel’s several hundred functions into your formulas. The functions are divided into categories, with the final category (More Functions) displaying, in a series of sub-menus, those categories which do not have their own drop-down menu.

This group does not need a launcher button, since the main dialog associated with formulas (Insert Function) can be accessed via the final option in each of the drop-downs.

The Excel Ribbon The Defined Names Group deals with the creation and management of names. Names are an Excel resource which allow you to associate a text label (the name) with a range of cells, a formula or a static value (such as a tax rate). When creating formulas, you can use the name instead of the value that it represents. This adds clarity to your formulas and offers you a powerful mechanism for updating several formulas by making a change to the value associated with a single name.

The Excel Ribbon The Formula Auditing Group options are designed to help you find errors in your formulas. Using these options, you can quickly highlight cells which are referred to by a formula and vice versa, or step through a complex formula, statement by statement.

The Excel Ribbon The Calculation Group has commands for controlling how and when Excel performs calculations. In workbooks that contain many formulas—especially formulas that link to external workbooks—the need to calculate the result of formulas can have a negative impact on the usability of a workbook. Hence, this group offers the ability to make calculation manual, so that Excel will only perform calculations when you click the Calculate Now button.

The Data Tab

In the Data Tab of the Excel Ribbon you will find commands for importing information into Excel from sources such as external databases; sorting information and also filtering (in other words returning only data which matches certain criteria).

Here you’ll also find advanced tools for consolidation, validating data and performing “What-if” analysis. Also, in the outline section, there are commands for assigning different levels to the various columns and rows of a worksheet. Excel’s powerful outlining commands make large worksheet easier to manage and to navigate.

Screen Clipping

The Data Tab contains Excel’s powerful data analysis tools.

The Excel Ribbon The Get External Data Group contains commands which are used to import data from external sources into the Data Model, which can then be used to perform data analysis and visualization using pivot tables, pivot charts and the Power View add-in. These same commands can also be found in the PowerPivot add-in, which offers you a host of additional features for modelling imported data sets.

The Excel Ribbon The Connections Group has options for working with existing connections. The Connections button displays the Workbooks connections dialog where you can review and remove connections. The Refresh All button allows you to replace obsolete copies of imported data, permanently stored within the data model, with the latest version from the original source.

The Excel Ribbon The Sort & Filter Group commands allow you to perform basic and advanced sorting and filtering on tabular data. The Sort A to Z and Sort Z to A buttons allow one-click sorting by a single column; while the Sort button displays the Sort dialog allowing you to perform multi-column sorting, as well as sorting by colour and custom lists.

Similarly, the AutoFilter button allows rapid filtering of information according to preset criteria; whereas the Advanced Filter command allows you to isolate data which matches more complex criteria.

The Excel Ribbon The Data Tools Group provides access to specialized, built-in Excel utilities each of which performs a useful data manipulation task. For example, the Text to Columns command allows you to parse data which currently occupies a single column (typically after being imported into Excel) into separate columns. The group also contains the powerful Remove Duplicates and Flash Fill commands.

The Excel Ribbon The What-if Analysis tools (Goal Seek, Scenarios and Data Tables) are data analysis tools which have been part of Excel’s arsenal for ages.

The Excel Ribbon The Outline Group is the home for another long-standing Excel feature called grouping and outlining: the assignation of a hierarchy of levels to different rows and columns. This capability is very useful for making large worksheets easier to manage and manipulate.

The Review Tab

The principal theme of the Review Tab is checking, protection and the multi-user sharing of workbooks. It is here that you will find Excel’s spell-checker, commands enabling users to add comments to a worksheet, options for protecting both worksheets and workbooks and for sharing workbooks with other users across a network.

Screen Clipping

The Review Tab contains options for the protection and sharing of workbooks.

The Excel Ribbon The Proofing Group contains the familiar Spell-checker and Thesaurus commands; as well as a Research tool which allows you to perform searches in several local and online references, including Bing and Encarta.

The Excel Ribbon The Language Group is a subset of the Research tool which allows you to translate common words and phrases from, or into, over thirty different languages.

The Excel Ribbon The Comments Group provides the ability to annotate worksheets with notes; both for your own benefit and as a workgroup facility, for sharing your thoughts on worksheet content with colleagues. The Group has buttons for creating, editing, deleting, showing and hiding comments.

The Excel Ribbon The Changes Group houses the most powerful commands in the Review Tab. The Protect Sheet and Protect Workbook commands can be used to restrict access to specific cell ranges, control user modifications, and to protect the workbook structure. There are also commands for the multi-user sharing of workbooks and the tracking of changes made by different users to the same workbook.

The View Tab

The View Tab houses controls relating to the way in which your workbooks and worksheets are viewed on screen. It contains commands for zooming in and out on your work and for displaying several worksheets and workbooks simultaneously.

Screen Clipping

The View Tab contains options which allow you to control the on-screen appearance of your worksheets.

The Excel Ribbon The Workbook Views Group buttons change the way your worksheets are displayed: Normal view is optimized for speed; Page Break Preview allows you to customise pagination; Page Layout gives an accurate preview of how documents will print; and Custom View lets you save on-screen and page setup attributes.

The Excel Ribbon The Show Group has commands which allow you to show and hide key elements of the Excel interface such as row and column headings, gridlines and the formula bar.

The Excel Ribbon The Zoom Group buttons control the magnification at which you view your work. You can, for example, highlight a range of cells and click the Zoom to Selection button to have Excel automatically zoom in or out so that the selected range fills your screen.

The Excel Ribbon The Window Group offers options which are useful when working with several different documents. For example, the Arrange All commands will reduce and size all of the currently open windows, so that you can see their contents simultaneously.

The Excel Ribbon The Macros Group has a single drop-down control which allows you to view all of the macros in any of the open workbooks, as well as recording new macros. (Macros are automated series of commands which can be executed automatically at the click of a button.